Thursday, February 14, 2013

Valentine's Day Pancakes

I got up this morning and made special pancakes for my babies since tonight will be wild with stuff and last night I had class.  Of course, any time I decide to make pancakes for them it is special BUT these were extra special AND the leftovers are now in the freezer so that they can have pancakes for several mornings!

Now I'm no great pancake maker.  Never have been, never will be.  So please excuse the crudeness of my pancakes.  I also couldn't find my regular heart cookie cutter so I used my double heart and xo cutters instead.  As someone pointed out to me - each time I do something from pinterest, I make it my own by changing it up.  This is probably how it is meant to be because even when I have the right "equipment" I wind up not being able to find it when I go to make whatever it is - but then it turns up later when I need it for something else.  Personally, I believe these are little personal lessons to me.

Here are some little bits of love for my babies (yes, even when they are grown, they are my babies!)....
And at the end I played around with the last little bit of batter ....

 
So this turned into two things at once - a special breakfast for my children and some stock for my freezer grab-n-heat "meals" for the kiddos.  Two for one is usually pretty great!

Wednesday, February 13, 2013

Crossfit 90 Day Challenge - Day 16

Sorry I've been a slacker in keep up ... I'll just have to start up again with this one!

Day 16
2 rounds for time of:
100 Jump rope
50 Shoulder to overhead (shoulder press), 20 lbs
25 Knees to elbows

What I did: 6 minutes
While that seems great ... I slacked on the shoulder presses ... :-/
2 rounds of:
100 Jump rope ... Yes completed
50 Shoulder to overhead (shoulder press), 20 lbs .... 20 lbs but only 20 each round
25 Knees to elbows .... Yes completed - laying down because I couldn't get to the bar properly - laying down is harder for me as it works more ab muscles for me - knees to elbows done "correctly" are like candy to me so I pushed myself a little bit


I have weak arms - this is not news to me - but it still disappoints me every. single. time.

Gardening By the Week

I was just going through my book "Week by Week Vegetable Gardener's Handbook" by Ron Kujawksi & Jennifer Kujawski.  I thought perhaps I'd share since I know a lot of people wonder how I manage my gardens on top of everything else.  This is pretty much how I do it.  Granted, I do have to deal with certain things like when My Honey will do some tasks but overall, this gets me through.

Now I'm in Zone 7 (whether A or B is up to the map I consult).  Technically the "last frost" for this area is slated for April 15th.  But I'll continue in the tradition of my Papa which is nothing goes in the ground before May 1st.  He has been the only one whose garden lived because he adhered to this despite his brothers-in-law planting April 16th, when a late frost swooped in and killed everything.  This year, May 1st will be tough with it being not only finals week but also Holy Week.... but I'll get it done one way or another!!

Anyway, this puts me at about 9 weeks before the average last frost.

This week I'll be attempting to get some eggplant, peppers, anise, and parsley seed sown indoors.  I don't grow summer savory, fennel, or chervil - though I should.  If you do, then get those seed started as well.

I'll be back later with the things I have already completed and still have yet to complete to be caught up.  I'm a little behind this year but I should be all caught up by the time the end of *my* spring break rolls around in a few weeks!!

Oil Pulling

So I've been giving this thing called oil pulling a try for close to three weeks now ... trying to get in the habit of doing it daily but hasn't quite worked out as well as all that YET!

Oil pulling is basically swishing around oil in your mouth first thing in the morning - before brushing your teeth or drinking anything.  Apparently, the oil - specifically sunflower or sesame - captures toxins within your mouth, going so far as to draw them from your gums and teeth.  When you finish swishing - for 15 - 20 minutes - the oil is whitish which means it is full of toxins.  One does not want to swallow this in any way, shape, or form.  Immediately after spitting out the oil one needs to brush their teeth, then go about their normal morning.

With oil pulling dental health is supposed to improve: teeth become whiter, breath fresher, eliminates bleeding gums, metabolism intensified, and a variety of maladies have been helped due to the detoxifying properties of oil pulling.  I was born with bad teeth that have only gotten worse even with great and careful oral hygiene care.  I'm hoping for help in this area just to help my teeth last longer.  And what's giving it a try going to hurt - my horrible gag reflex?

Here is a link for you to read more about oil pulling since I did just the barest of overview.

Anyway, the first two weeks I used coconut oil.  It's not one of the recommended oils but it's what I had as I didn't think I could handle the strong olive oil flavor.  I could not get even half a teaspoon to stay in my mouth without gagging beyond control.  I had read that the time that it takes to melt can be a bit much for some folks.  So I decided to melt a little in a spoon with warm water.  This helped greatly for me to get started.  Not ideal but if I could work up to the amount of oil AND get in the habit then whatever.

Finally I was able to buy some sesame oil.  I tried a spoonful and almost promptly spit it right back out as my gag reflex revolted immediately.  So the next morning I mixed the oil with warm water and that worked better.  At first I was barely making it 30 seconds.  This morning I made it to 5 min 38 seconds!!  I just have to be careful on the oil to water ratio ... the oil is ever increasing but by miniscule amounts.  Whatever gets me there!

So far there have been slight improvements but I don't know if it's that I'm paying closer attention or what.  So I'll wait before posting about those!

Wednesday, February 6, 2013

Overnight, No-cook Oatmeal

Yum!  This was really good!  I'm so glad I found this recipe over at The Yummy Life!  She has several variations of Refrigerator Oatmeal but I tried the Cocoa Banana one since I knew, right off the top of my head that, I had all the ingredients - well I did use ground flax seed instead of chia seeds.  I cannot wait to try several of the other ones throughout the year as different fruit seasons come in and I'm able to pick fresh and freeze more for winter usage :)


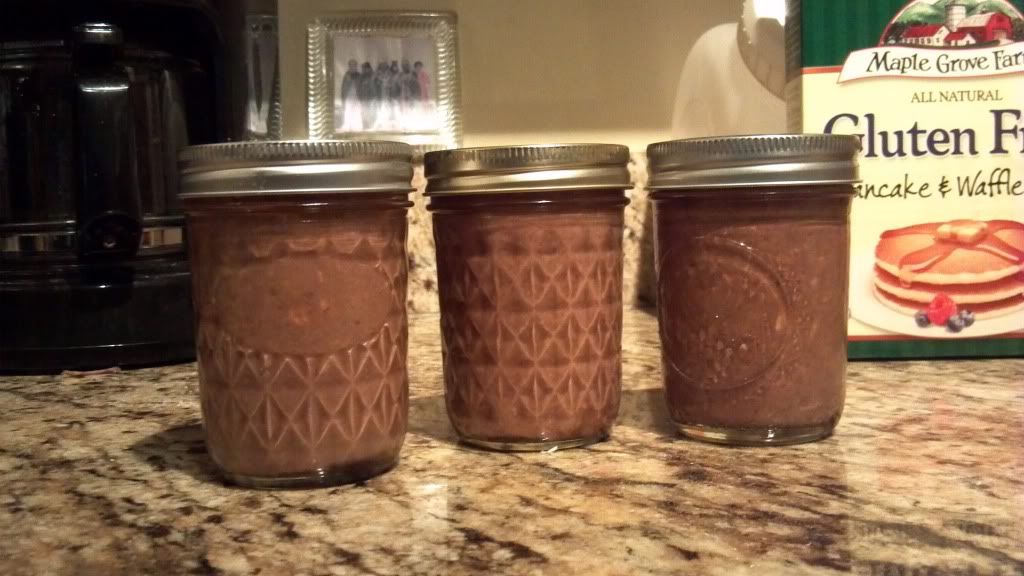
These are my finished jars ready to go into the fridge!  I was slightly worried about how much cocoa was in them, but this morning evaporated all that worry like the sun shews away the fog! Yummy, yummy goodness :)

Of course, this lends itself into the fact that I don't buy a lot of dairy-free yogurt (or any yogurt for that matter) ... BUT I *really* want to make these a lot more often ... and wait until the kids get ahold of them - then I'll really be up the creek because there's no way I'll be able to make enough of them without paying an arm and a leg which makes it so not worth it :(
Soooooooo, I'll be starting my own yogurt tomorrow afternoon!  I've been wanting to for so long but have just been too lazy to do it.  This is my swift kick in the pants to get it going!  The Yummy Life has quite a few other recipes that call for yogurt as well that I want to try and therefore will make this yogurt-making adventure well worth the effort (even though I keep hearing how easy it is - it's just all about getting up and getting started!).

Breakfast Biscuits

So last night I had a little baking foray.  We're pretty tight on money with all the new taxes and medical insurance being taken out.  So instead of running off to the store to make sure I had breakfast foods for the children in the morning, I decided to make some more breakfast biscuits they have been loving on.  I have made some changes from the first time I made them...

One: Instead of using ground sausage (for which we have a ton in the freezer), I used bacon by request.... but sorry kiddos, the rest will be with sausage until we've made a heavy dent in our supply or come across a huge sale on bacon or someone doesn't pick up their bacon at the processor's - yeah, right.

Two: I used a pancake batter rather than biscuit batter. It was something the kids hinted at some time back that I thought I'd do differently this time around.  My Honey informed me he likes the biscuits so please make him some of those next time instead.

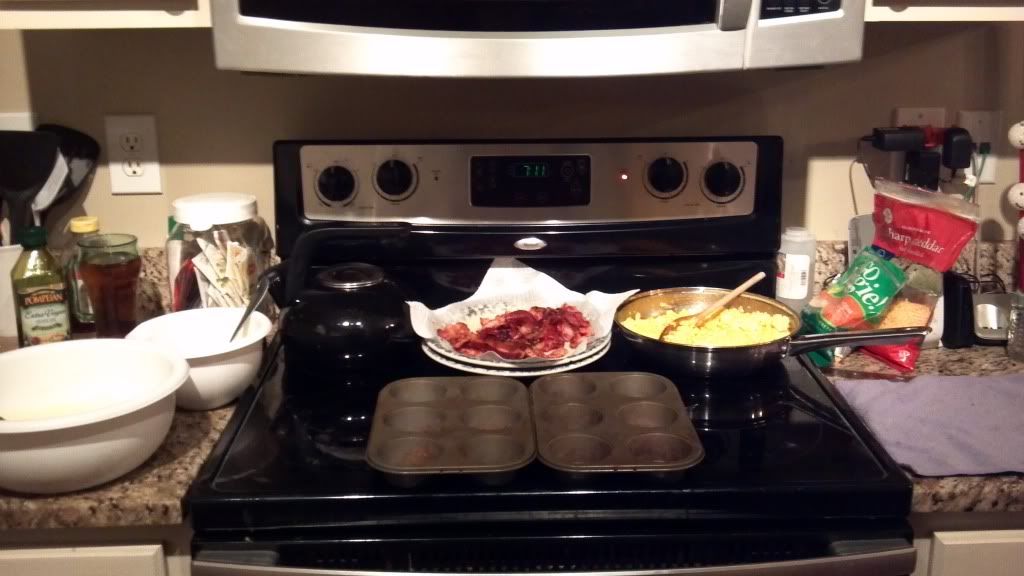
I have to deal with food allergies so for this I had to have a tin dedicated to Gluten-free biscuits and one dedicated to Dairy-free biscuits.  Here was my assembly set-up ... I seriously need more muffin pans!

To the Left is a big bowl of glutenfied batter and a small bowl of gluten-free pancake batter!  To the Right is a bag of dairy-free veggie shreds and a bag of reg cheddar shreds.  On the stove is a plate of bacon and a pan of eggs along with my tea pot and my muffin tins :-)

In assembling I do it slightly different than the blog post I referred to does it.  She uses canned biscuits.  If I get them on sale for 50 cents or less then I might get them as well - but I like making my own batters. 
So I put a Tablespoon or so (a dallop sounds more appropriate here ;-) ) on the bottom of each muffin tin.
I add in the fillings: break up the bacon in pieces, a scoop of eggs, a Tablespoon of shredded cheese .... anything else you want in here??  Caramelized onions, bell peppers, mushrooms, spinach, hashbrowns.... the possibilities are abounding.
Then dallop a bit more batter on top, sort of spreading it a little bit if needed.
Pop in the oven (same temp and time as regular biscuits).
Pull out of oven and let cool.
Pop out of muffin tins on to a cooling rack and start the next batch.
Repeat until out of ingredients :-)


Here they are: 33 regular biscuits; 8 dairy-free biscuits, and 7 gluten-free biscuits ... I ran out of gf mix so I made the regular mix stretch a bit to fill up the tins.
Once they've cooled completely, flash freeze them, and then put in LABELED freezer bags.

To flash freeze, place muffins on a cookie sheet that will fit on a shelf in the freezer, put in freezer and keep there until hard to the touch (not all that long).  Then immediately pop them into the freezer bags and back into the freezer.

We definitely have to label our baggies of muffins due to food allergies, but most people will need to label anyway with at minimum a date ... and if you make different varieties, then which varieties.  Some like to put heating instructions on the baggies as well.

Speaking of heating....
To reheat, just pop into the microwave and heat on high for 30 seconds at a time.  OR thaw a bit and pop into warmed oven for a few minutes (they could brown a bit more so you might not want to bake completely thoroughly if you are going to be warming in the oven).


The good news is, these little buggers are quite versitile!  I have a few more variations I'll be using of this recipe ... one is even like a mini-pot pie - yum!


Crossfit 90 Day Challenge - Day 7

Challenge Day 7
WOD:
For time:
20 Front squats, 40 lbs
30 Box jump, 18 inch box
40 Kettlebell swings, 15 lbs
50 Wall ball shots, 10 pound ball


What I did: 6:45
20 Front squats, 20 lbs
30 Box jump, 8 inch box
40 Kettlebell swings, 15 lbs
50 Wall ball shots, 5 dumbbell


Ouch!  I'm sore from the past couple of days and this just kept right on working those areas by default though not targetted.  Which is good in a way - I get nice and stretched out in those sore areas and the pain does subside faster.  Of course, if I get too wimped out I could rub on some Arnica Gel and really do away with the pain!  ;-)  But I like to feel my workouts until they interfer with my normal daily activities.

Got a long day of cooking and paperwork to do so I need to get at it!